Databricks is a Unified Data Analytics Platform created by Apache Spark Founders. It provides a PAAS on Azure (Partnered with Microsoft) Cloud to solve complex Data problems. Databricks comes with an End to End Data Infrastructure wherein it manages Spark compute clusters on Azure VMs along with managing Job Scheduling via Jobs, Model Training, Tracking, Registering and Experimentation via MLFlow and Data Versioning via Delta Lake.
Databricks as an organization has open sourced multiple ground-breaking services including -
- Apache Spark - http://spark.apache.org/
- MLFlow - https://mlflow.org/
- DeltaLake - https://delta.io/
Along with these Databricks also provide state of the art support for -
- Redash (Data Visualization Company acquired by Databricks recently) - https://redash.io/
- Tensorflow - https://databricks.com/tensorflow
- Koalas - https://koalas.readthedocs.io/en/latest/
Now, let’s jump to see how Databricks setup is done on Azure and how it helps to solve your data problems.
Architecture
Databricks provides a shared responsibility Model to its customers, wherein their Frontend UI (Control Plane) runs in their own Azure Account and Spark Compute Clusters (Data Plane) runs in Customer’s Azure subscription.
Setup Databricks on Azure
To setup Databricks on Azure, we need to follow following documentation from Azure Databricks - Databricks Setup
After successful completion of all the steps highlighted in the official documentation, we will have Azure Databricks running with a custom name as adb-<workspace-id>.<random-number>.azuredatabricks.net
Databricks Clusters
Databricks is designed and developed to handle Big Data. Within Databricks we can create Spark clusters which in the backend spin up a bunch of VM machines with 1 driver node and multiple worker nodes (Worker Nodes are customizable and are defined by the user).
Within Azure Databricks we can create a cluster using either UI, CLI or Rest APIs. In all cases, it invokes an API call to Clusters API. Official documentation -
https://docs.microsoft.com/en-us/azure/databricks/dev-tools/api/latest/https://docs.microsoft.com/en-us/azure/databricks/dev-tools/api/latest/clusters
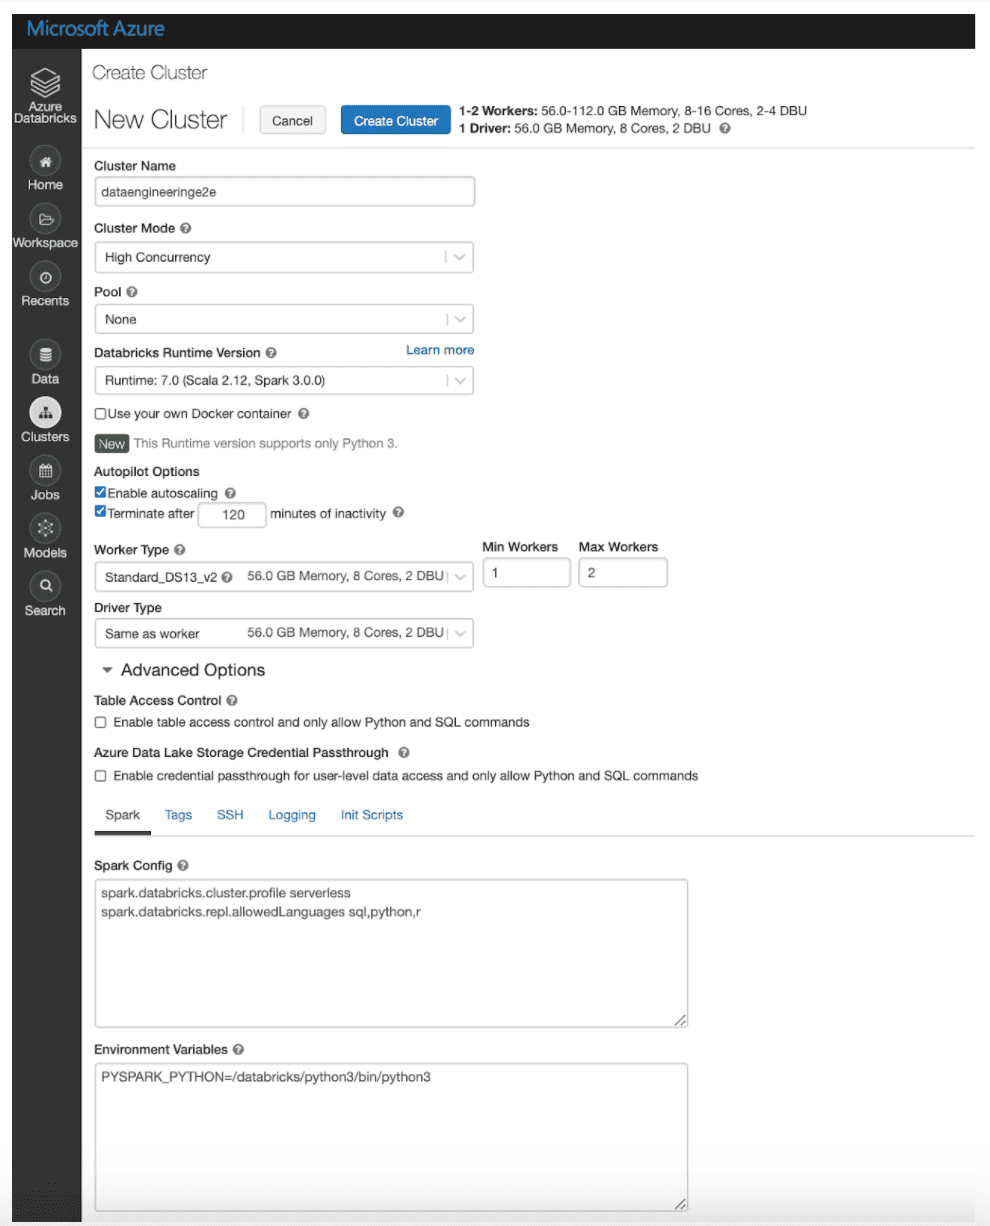
Let’s now jump on to Cluster creation within Azure Databricks.
Creating Databricks Spark Cluster via UI
Input Variables -
- Cluster Name : Any user friendly name
- Cluster Mode : Databricks provide 2 types of Cluster Mode named High Concurrency and Standard. The difference between the two are - if multiple users are connected to a single cluster to run their jobs, it’s recommended to use High Concurrency Mode as in this case Databricks takes care of fair scheduling, resource allocation to each user per job etc. If it’s a single user, we can simply use Standard Cluster mode
- Pool : Databricks provides a feature called Pools. A user can create a pool of machines which can be up and running as per desired configuration and can help to speed up the cluster creation time or autoscaling time
- Databricks Runtime Version : This is the most important feature which basically governs your Spark version and corresponding libraries
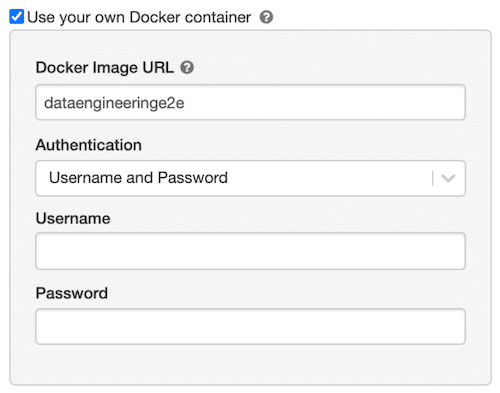
Databricks provides a feature called Databricks Container Services (DCS). This is Databricks' way of handling Docker Images. We can use DCS to package our libraries and pass it to our cluster which in further will load all the libraries as mentioned in the image during cluster creation time. With DCS, we can load the image from either ECR, ACR or Dockerhub.
To use an ACR Image, we need to check the “Use your own Docker container” option. Choose Authentication Mode as "Username and Password". Username would be Azure Service Principal Client ID and Password would be Azure Service Principal Secret Password. Our Service Principal should have access to pull image from ACR.
Enter the entire URI of the Docker Image from ACR
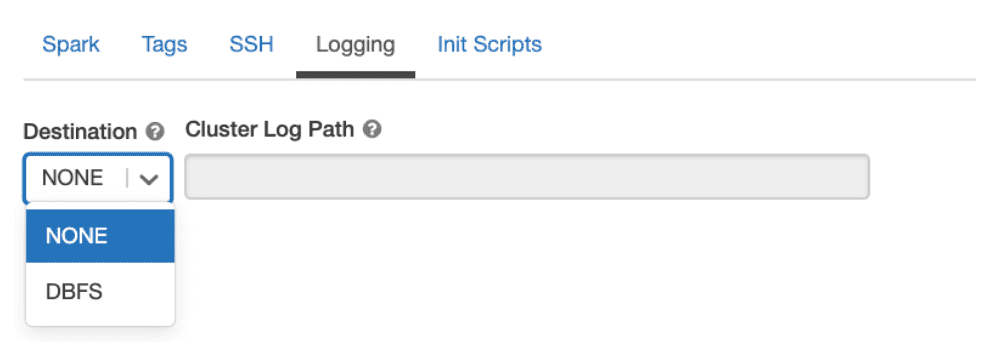
AZURE_REPOSITORY.azurecr.io/dataengineeringe2e:latestWe can also add Cluster Level Logging, so that all our logs are saved permanently at a location as defined by the user - DBFS.
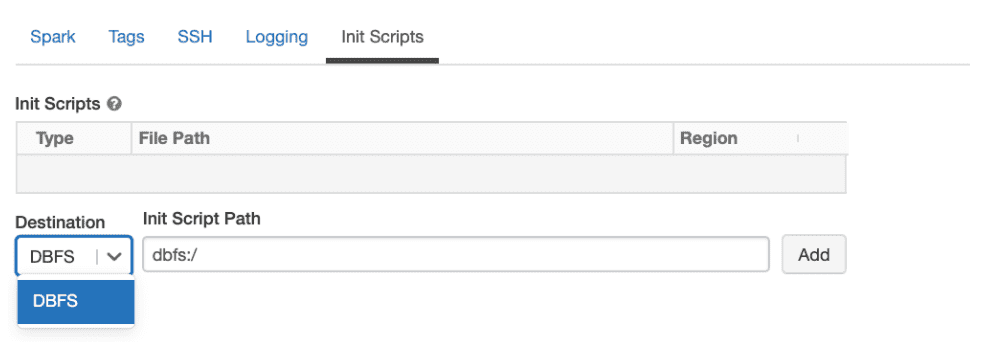
Init Scripts is Databricks' way of managing libraries. If a user does not want to use DCS (Docker Container) to manage his/her libraries, he/she can make use of Init Scripts. These are simply Shell scripts that reside in DBFS and can be executed at Cluster creation time.
Create Databricks Spark Clusters via CLI or Rest API
Firstly, we need to generate a Databricks Access Token. Official documentation for the same is below - Azure Databricks CLI Authentication
Once we have generated a token, we need to Install and Configure Databricks CLI. Official documentation with steps to install Databricks CLI is below - Azure Databricks CLI Install
After Azure Databricks CLI is set up correctly we can simply create our Cluster using the following JSON. The JSON mentioned here contains exactly the same information that we inputted while creating the cluster via UI.
{
    "num_workers": null,
    "autoscale": {
        "min_workers": 1,
        "max_workers": 2
    },
    "cluster_name": "dataengineeringe2e",
    "spark_version": "7.0.x-scala2.12",
    "spark_conf": {
        "spark.databricks.cluster.profile": "serverless",
        "spark.databricks.repl.allowedLanguages": "sql,python,r"
    },
    "node_type_id": "Standard_DS13_v2",
    "ssh_public_keys": [],
    "custom_tags": {
        "ResourceClass": "Serverless"
    },
    "spark_env_vars": {},
    "autotermination_minutes": 120,
    "enable_elastic_disk": true,
    "init_scripts": [],
    "docker_image": {
        "url": "dataengineeringe2e.azurecr.io/dataengineeringe2e:latest",
        "basic_auth": {
            "username": "username",
            "password": "password"
        }
    }
}
Cluster Creation CLI command -
databricks clusters create --json-file path_to_json_file