Kubernetes is quickly becoming the de-facto standard for deploying and managing applications on the Cloud. With all the benefits and power it provides, it also involves a steep learning curve. As a newcomer, Kubernetes can become a bit overwhelming at the start. Therefore, this blog post comes with a simplified view and a startup guide of it. I will cover all basic aspects of it including what it is, how its being used, about the architecture, how its packaged all together from a hardware and a software perspective.
So, what you're waiting for 😀. Let's straightaway jump into it.
What is K8s ?
Kubernetes is a portable, extensible, open-source platform for managing containerized workloads and services, that facilitates both declarative configuration and automation. It's developed by Google and open sourced in the year 2014 for public use.
Architecture
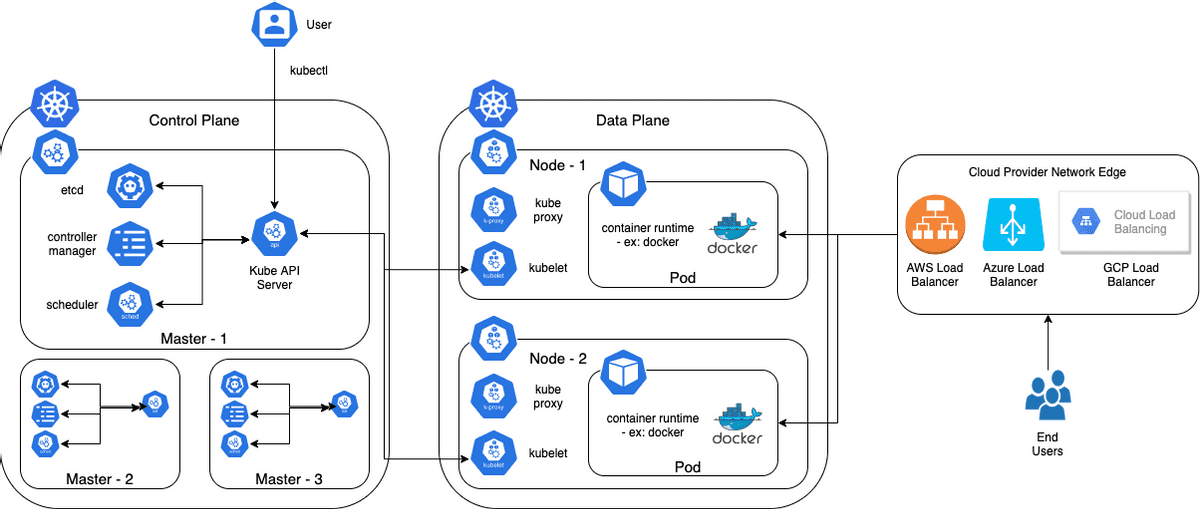
- Nodes - Kubernetes runs your workload by placing containers into Pods, that runs on Nodes. A node is a virtual or a physical machine, depending on the cluster. Each node contains the services that helps to run Pods, managed by the control plane. The components on a node include the kubelet, a container runtime like Docker, and the kube-proxy.
- Master Nodes - Master nodes runs the Kubernetes Cluster. They help bind together entire cluster and keeps an eye on the worker nodes as well. Master Nodes runs as part of the Control Plane and in a production environment ideally we run 3 Master Nodes.
- Worker Nodes - Worker nodes are the one who actually performs the task as asked by the Master Nodes.
- Kube API Server - When we interact with our K8s cluster using kubectl, we are actually communicating with the Kube API Server component. The API Server is the heart of the entire cluster. It processes REST operations, validates them, and updates the corresponding objects in Etcd.
- Etcd - Etcd is a distributed, consistent key-value store used for configuration management, service discovery, and coordinating distributed work.
- Controller Manager - A controller watches the state of the cluster through the Kube API Server watch feature and, when it gets notified, it makes the necessary changes attempting to move the current state towards the desired state. Some examples of controllers include the Replication Controller, Endpoints Controller, and Namespace Controller.
- Scheduler - The Scheduler watches for unscheduled pods and binds them to nodes, according to the availability of the requested resources.
- Pod - Pod is the smallest unit of the Kubernetes Cluster. It's where your container runs. A pod can run multiple containers at a time inside it.
- Kubelet - The kubelet makes sure containers are running in a Pod. Whenever the Control Plane needs something to happen in a node, the kubelet executes the action.
- Container Runtime - To run the containers, each Node has a container runtime engine. The most sought after runtime is Docker to run Docker containers.
- Kube Proxy - It's a network proxy for facilitating Kubernetes networking services. The kube-proxy handles network communications inside or outside of your cluster.
- Kubectl - Kubectl is Command Line utility to interact with your Kubernetes cluster.
Kubectl
To install Kubernetes (K8s) Command Line Utility also called as kubectl, kindly follow link - Install Kubectl
Minikube
To learn Kubernetes we need a cluster. We can create a cluster using any Cloud provider that we have access to. Every major Cloud whether AWS, Azure or GCP comes with it's own version of K8s service.
- AWS: Elastic Kubernetes Service - https://aws.amazon.com/eks/getting-started/
- Azure: Azure Kubernetes Service - https://docs.microsoft.com/en-us/azure/aks/
- Google Cloud: Google Kubernetes Engine - https://cloud.google.com/kubernetes-engine
However, it costs dollars to create a cluster on the Cloud. Therefore, for this blog we will be using a Minikube Cluster. We can install and setup Minikube by following document - Install Minikube
Once our Minikube Cluster and Kubectl both are installed and setup, we jump right into deploying the applications.
- Start Minikube Cluster
minikube start --cpus=4 --memory=8048 --kubernetes-version v1.15.3
- Check Minikube Cluster and Nodes
kubectl cluster-info
kubectl get nodes
Minikube Cluster provisions a single node on our machine itself. It's an open source utility to build a K8s cluster for learning and test purposes
Now, let's dig into some Kubernetes basics to get us started 😎
Namespace
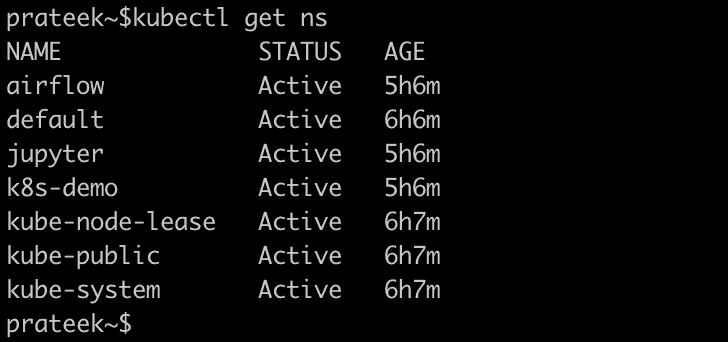
Namespace is logical separation of resources in Kubernetes. In k8s we can create namespaces on the basis of teams, projects etc to separate the resources. We can create a namespace simply by using kubectl as -
kubectl create ns <namespace_name>We can also create a namespace object using YAML files as defined here - https://github.com/dprateek1991/Data-Engineering-Courseware/tree/master/kubernetes/namespace
Also, we can simply run deploy.sh to create all namespaces in our K8s cluster.
- List namespaces
kubectl get ns Deployment
To deploy your application in K8s, we need to create a Deployment object. For this tutorial I have created one showcasing how to deploy a Hello World application. It's a simple web service created using NodeJS displaying Hello World. The YAML definition of our service looks something like - https://github.com/dprateek1991/Data-Engineering-Courseware/blob/master/kubernetes/deployment/hello-world.yaml
We can deploy our application using deploy.sh
The DOCKERFILE for our application is hosted on DockerHub and its code is present here - https://github.com/dprateek1991/Data-Engineering-Courseware/tree/master/docker-stack/hello-world
- Post deploying the application, we can check it as -
kubectl -n k8s-demo get deployHere we can see 3 sections as READY, UP-TO-DATE and AVAILABLE mentioned as 2/2, 2 and 2 respectively. This means there are 2 replicas running for our application. I'll explain in next section what these replicas mean.
Pod
Pod is the smallest unit in a K8s cluster. Pod helps to run containers on the nodes. These containers can be Docker images containing your application. A k8s pod can run 1 or many containers within it. When we deployed our Hello World application, it ran 2 Pods in our namespace. We can check the running pods as -
kubectl -n k8s-demo get podsReplica Set
In a production environment to keep our application highly available its recommended to run multiple replicas of our application. In our case, we're running our app with 2 replicas. We can define the number of replicas we want in our deployment YAML itself under spec as -
spec:
  replicas: 2
This definition will make sure there are always 2 replicas running for our application in our K8s cluster. If for whatsoever reason, 1 pod is down, k8s will make sure to spin up an another pod to always keep number of pods running as 2. We can list our replica set as -
kubectl -n k8s-demo get rsSecret
Secrets are used to store credentials in K8s. We need to create a secret which contains credentials related to our DockerHub account, so that our deployment can pull our Hello World DOCKERFILE from there. We can create secrets using SECRET object type in K8s. The code to do it is here - https://github.com/dprateek1991/Data-Engineering-Courseware/tree/master/kubernetes/secret
- We can list secrets as -
kubectl -n k8s-demo get secretSecrets are defined in deployment object under container spec as -
spec:
  containers:
  - name: k8s-demo
    image: dataengineeringe2e/hello-world
    ports:
    - name: nodejs-port
      containerPort: 3000
  imagePullSecrets:
    - name: dockerlogin
Service
Finally, the SERVICE object. In k8s we can create an object of type SERVICE to expose our application to the outside world for usage. It can be a web service or anything like a database server, wordpress etc. In our case, we have created a service object as - https://github.com/dprateek1991/Data-Engineering-Courseware/tree/master/kubernetes/service
- Once, deployed we can list our service as -
kubectl -n k8s-demo get svcWe can see our service is running at PORT 31001. To view our service, we need to expose the port on our localhost. To do this, we use something called as PORT FORWARD in k8s. To expose our application on localhost, we can run following command -
kubectl -n k8s-demo port-forward svc/hello-world-service 8080:31001The above command binds Node's 31001 port where our application is running to our 8080 port on localhost. Once doing so, we can check our application by opening following links on our browser -
127.0.0.1:8080 or localhost:8080In this example our service is of type NODE PORT. Kubernetes supports various different types including -
- ClusterIP — It's the default. It allocates a cluster-internal IP address, and it makes our Pods reachable only from inside the cluster.
- NodePort — It's built on top of the ClusterIP. Service is now reachable not only from the inside of the cluster through the service’s internal cluster IP, but also from the outside. Each Node opens the same port (node-port), and redirects the traffic received on that port to the specified Service.
- LoadBalancer — Built on top of the NodePort. Service is accessible outside the cluster. Traffic is now coming via LoadBalancer, which then is redirected to the Nodes on a specific port (node-port). We can use LoadBalancer in our Cloud K8s Clusters.
- ExternalName — You can have access to an external reference deployed somewhere else. Your Pods running in the k8s cluster can access them by using name specified in the Service YAML file.
Conclusion
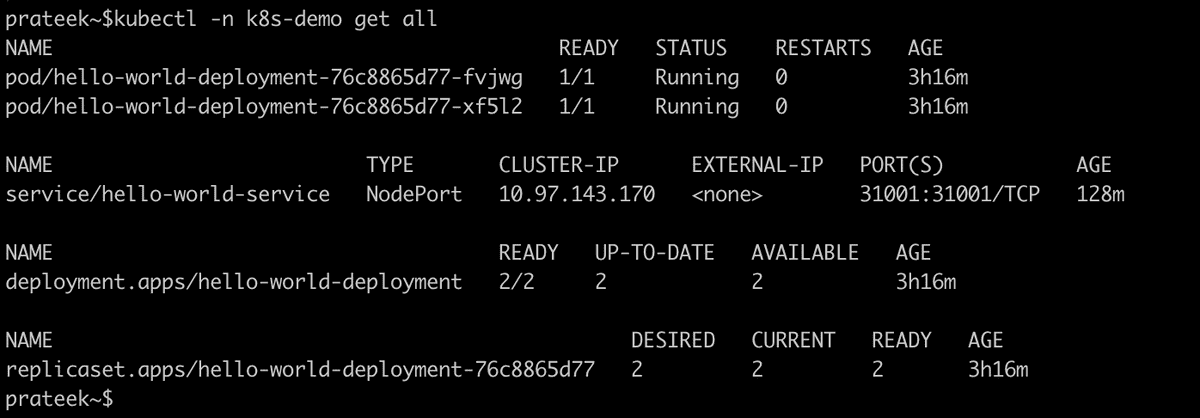
At the end, I hope this blog served as a good tutorial to learn the basics of K8s 🚀. Do give it a try and share your thoughts if you're able to replicate the steps I mentioned here 😃. We can list all the resources created as part of our Hello World application as -
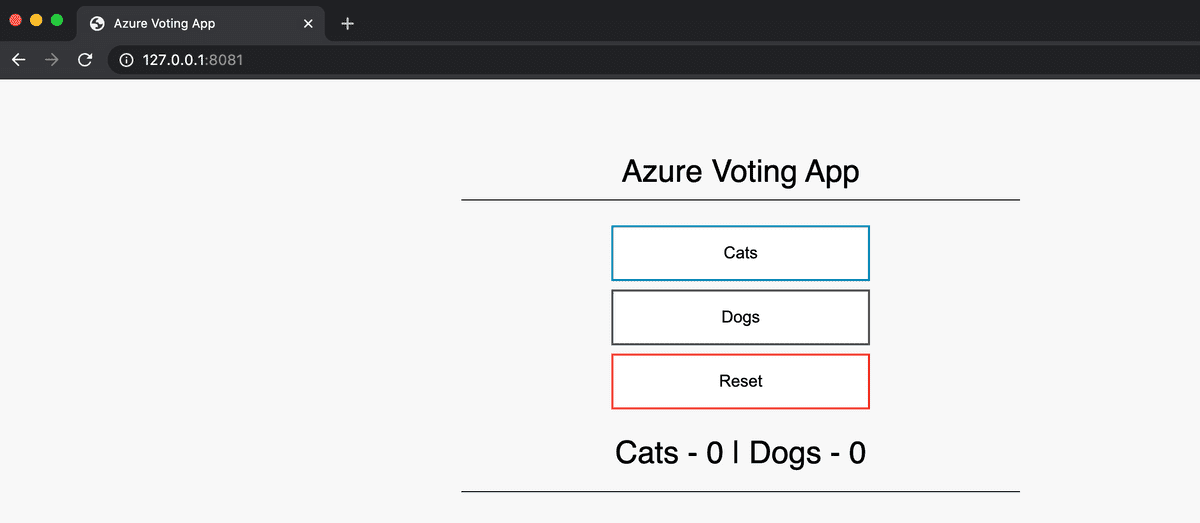
kubectl -n k8s-demo get allFor more fun learning, I have put in 1 more application as a tutorial. It has been taken from AKS tutorial from Microsoft. Feel free to try it out as well.
Kubernetes Cheat Sheet - https://kubernetes.io/docs/reference/kubectl/cheatsheet/ and https://kubernetes.io/docs/reference/kubectl/overview/
Enjoy Kubernetes 😎


